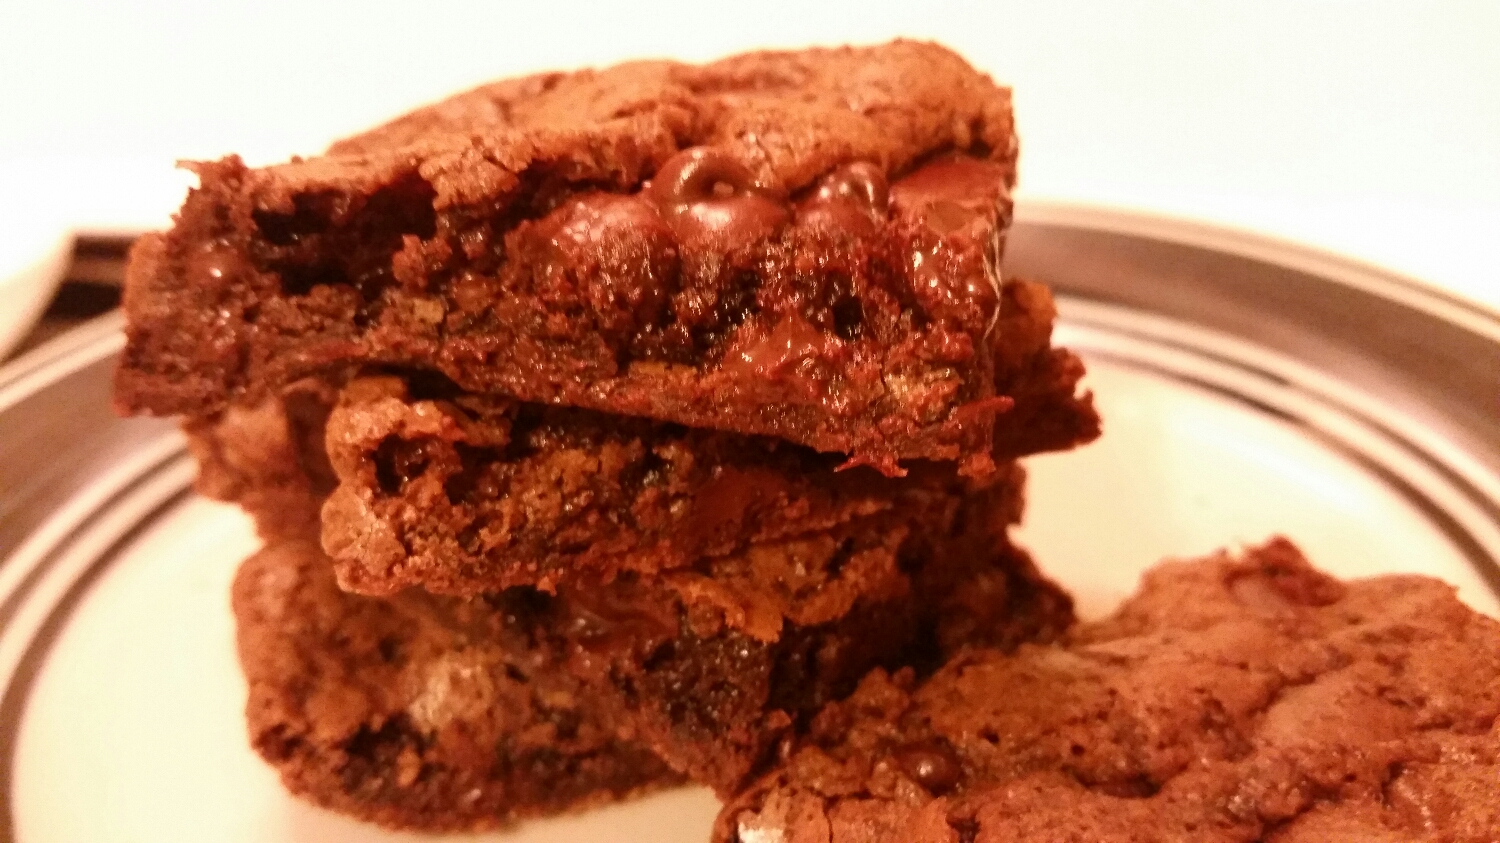
Brownies are just one of those things that I can eat non-stop. If someone mentions "brownies", I'm instantly craving them. But something that has gotten me for years is finding a great recipe for chewy, fudgy, homemade brownies that taste like they're from a box... only BETTER.
So after countless trial and errors and A LOT of research and baking, I stumbled on a brownie brittle recipe that made me think - how about a tasty, fudgey brownie brittle that's homemade? Something thats chewy in the middle but has a crispy outside all around. So I gave it a try.
After putting the batter together, I was shocked how GREAT it tasted. (I could usually tell how the dessert is going to be when tasting the batter).
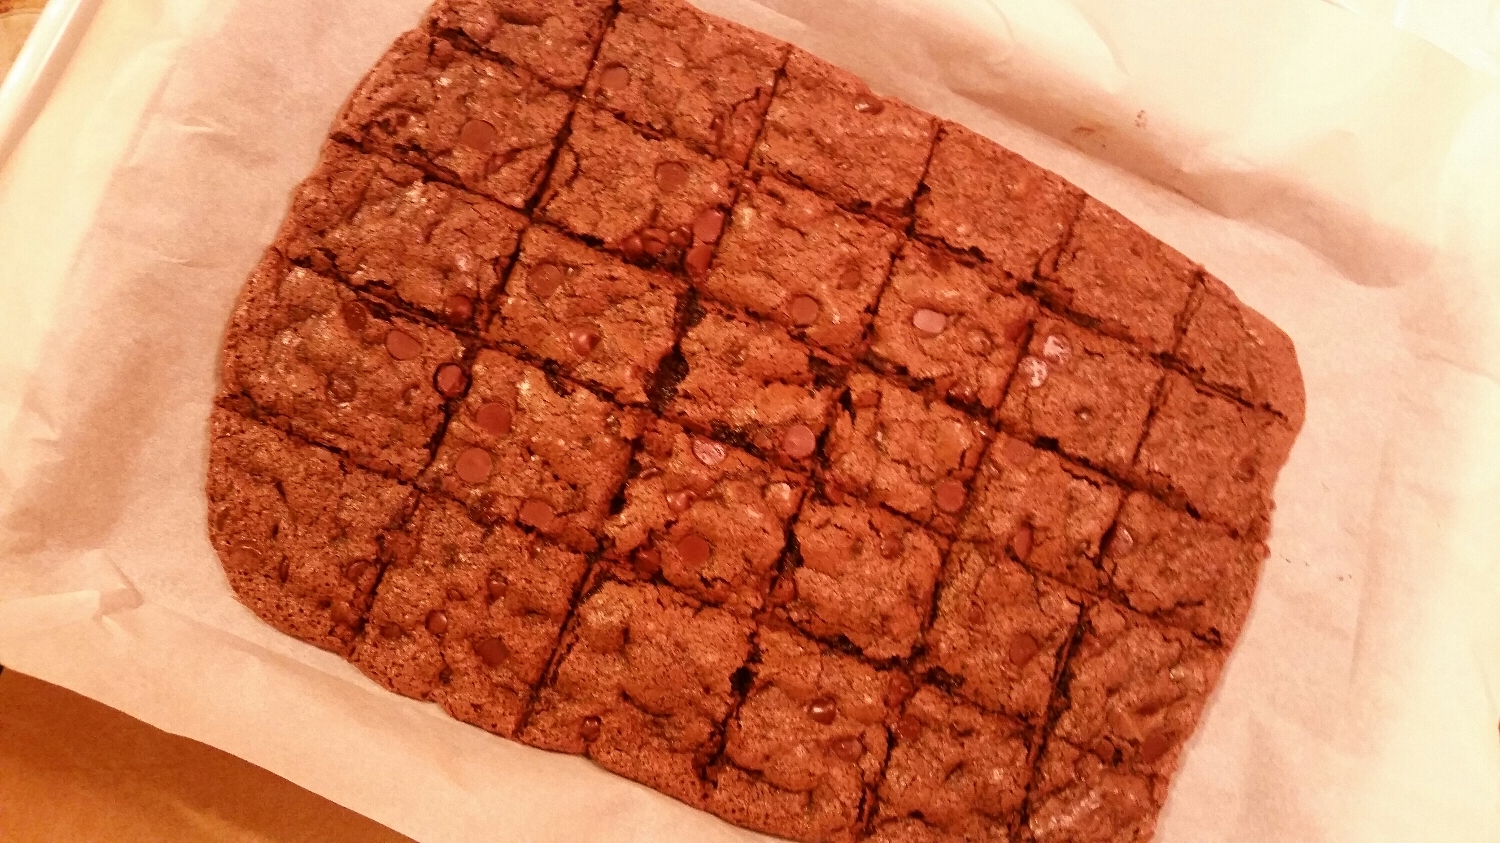
So I popped it into the oven and when they came out... THEY WERE BEAUTIFUL!
Now I haven't tried using this recipe as an actual brownie recipe, so it's up to you if you'd like to double the recipe and try it in a baking pan, but I have another recipe for that coming up next!
Ingredients:
- 1/2 cup all-purpose flour
- 1/4 teaspoon baking soda
- 1/4 teaspoon salt
- 1 cup sugar
- 2 Tablespoons cocoa powder (use a good chocolate!)
- 1/2 teaspoon cornstarch
- 2 large egg whites
- 1/4 cup vegetable oil
- 3/4 teaspoon vanilla extract
- 1/2 cup chocolate chips (for batter)
- 1/2 cup chocolate chips (for top)
Directions:
- Preheat oven to 325*, place parchment paper on cookie sheet.
- In medium bowl, mix together flour, baking soda and salt. Put aside.
- Whisk egg whites until they are frothy, if a mixer is easier than whisking with your hand, do that. Do NOT let it form peaks, you just want it frothy!
- Add sugar, cocoa powder, vanilla and oil into egg whites and mix until smooth, then add cornstarch, mix until dissolved.
- Add flour mixture to wet ingredients and mix until just combined (over mixing will ruin the brownies!)
- Add 1/2 the chocolate chips to the batter and mix until evenly distributed, just a few seconds!
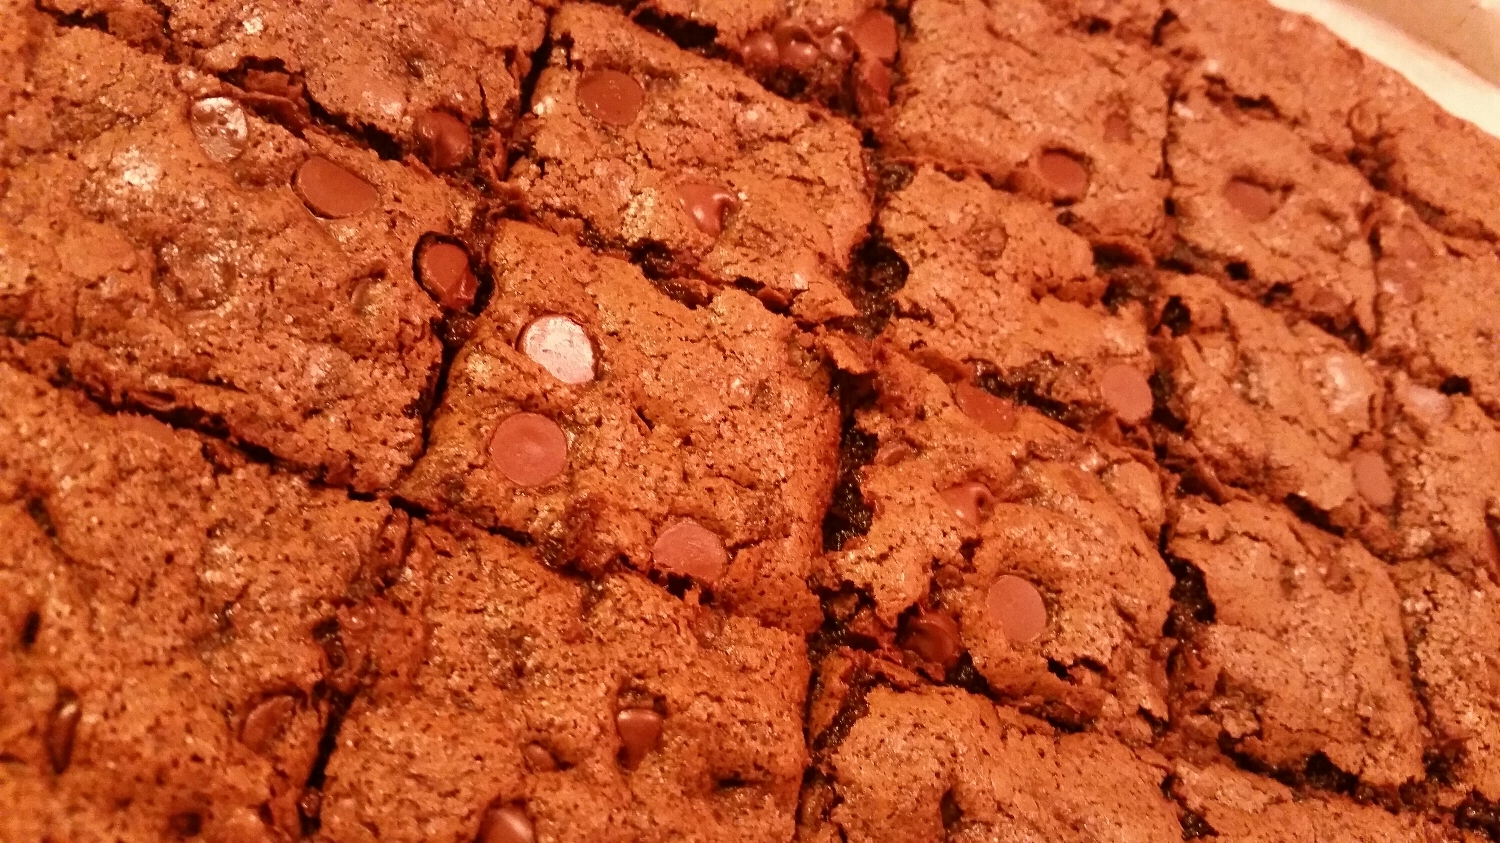
- Spread batter onto parchment paper. You want the batter to be about 1/4" thick, it will be tough to spread but just do the best you can. When you are done spreading it, sprinkle the rest of the chocolate chips on top.
- Bake for 20 minutes, when time is up, take them out and cut into squares but do not separate the squares! You're just making the lines!
- Place back into the oven for another 5-7 minutes (depending on how fudgey you like them).
- Let them sit for 10-15 minutes, cut into them and enjoy!
I love apple pie and I LOVE fries. Sometimes making a big ol' apple pie isn't the easiest thing to do when you're really craving one so instead, make these EASY, quick fries instead!
I once saw an article online with all different versions of "fries", one being apple pie fries. They all had different ways of making them, so I tried to make them as simple as possible. Now, homemade is always better, so its up to you how you want to make them but I have two versions, homemade and semi-homemade. It all depends really how fast you want them! ;)
Homemade Apple Pie Filling - I'll give you the apple pie filling I made myself to make these "fries". I did take the easy way out and bought one pack of store-bought pie crust which there is nothing wrong with, it just speeds up the process. I do have a nice flaky crust I'm working on right now, so maybe I'll post that later!
Ingredients:
- 1/4 cup of Flour
- 3/4 cup Brown Sugar (light or dark)
- 1/2 teaspoon of Ground Cinnamon
- 1 Lemon
- 6 medium Apples (I use Granny Smith)
Directions:
- Cut and peel apples. I usually cut mine in thin slices, especially for this recipe because I will be putting them in a food processor later.
- In a large bowl, mix flour, brown sugar and cinnamon together until blended. Take the juice of the one lemon and spread it over the cut apples.
- Stir together the sugar and apples until completely covered. Afterwards, place in a greased baking pan (13"x 9") and place in 400* oven for 30 minutes or until the apples are soft when poking a fork through it.
- Place apple pie filling (when cooled) in food processor to puree until big chunks are no longer visible.
There is your homemade apple pie filling.
How to make the Apple Pie Fries are below...
EASY OPTION:
- 1 can of Apple Pie Filling
- 1 box of Dough Pie Crusts (2 ct.)
- 1 Egg (for egg wash)
- Sugar (white or sugar in the raw)
- Lay out one pie crust on floured surface, with homemade or canned apple pie filling (that has been pureed in food processor), smooth over entire crust leaving an inch all around the outside to make crust.
- With egg wash, brush on outer area of crust.
- Place second crust dough on top of apple pie filling, fold over edges of dough to make the "crust" of the pie.
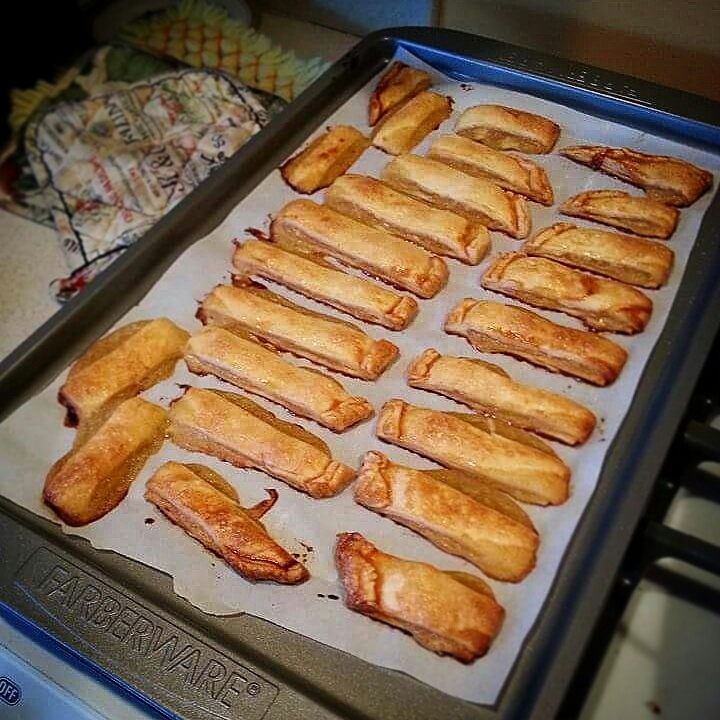
- With a sharp pizza cutter or knife, cut into inch thick "fries" (some pie filling will ooze out, this is okay. Be very careful when spreading them over baking sheet (I use a spatula). Be sure to line pan with parchment paper.
- Gently brush egg wash over each "fry" then sprinkle with sugar or Sugar in the Raw (for sea salt look).
- Bake in oven at 350* for 10-12 minutes or until golden brown and firm.
- Put on plate next to vanilla ice cream or caramel sauce for "ketchup" and there you have it! Enjoy!
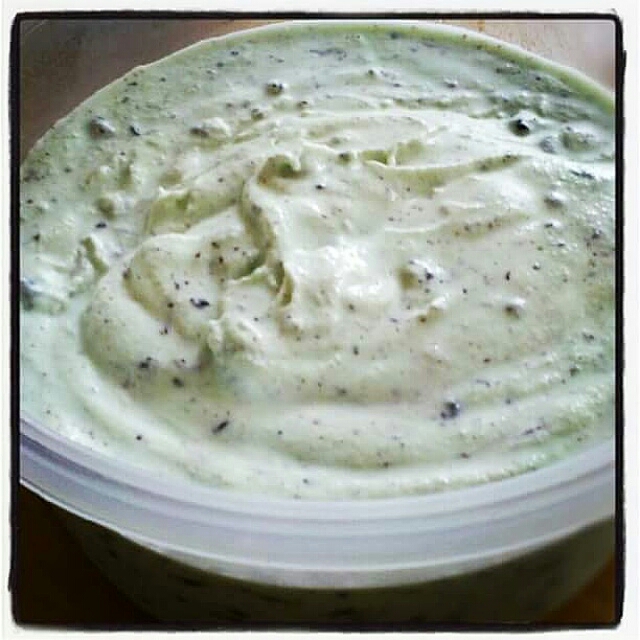
If you're anything like me, you LOVE ice cream. Whether it's just a simple treat here and there, or something more extreme like...dessert every night, this is a great and easy recipe I put together that doesn't require cooking before churning.
I want ice cream fast, something I don't have to wait for to boil over a stove (call me impatient, but come on, it's ice cream!) I use my ice cream maker that makes about 1 1/2 quarts of ice cream at a time so this recipe was made for that.
Since this doesn't require heating up, you may be able to make it and put it right in the freezer until it hardens and serve it that way. I mention this because on Instagram I had someone ask me about this recipe but they don't have an ice cream maker! So don't hold it to me if it comes out a little different without one!
Its creamy, smooth and not overly sweet. Instead of putting chocolate chips in, I have a HUGE block Belgian chocolate (I like semi-sweet) that I use to get thin shavings and chunks of chocolate for my ice cream.
Ingredients:
- 2 cups of Heavy Cream
- 1 cup of Whole Milk
- 1/2 cup of Granulated Sugar
- Pinch of Sea Salt
- 3/4 cup of Chocolate Chunks or Chips (whatever you prefer)
- 1 Tablespoon of Peppermint Extract (I use Simply Organic Peppermint Flavor)
- If using a block of chocolate cut about 3/4 cup of chocolate chunks and shavings. Put aside.
- In a large bowl, combine milk, sugar and salt and whisk until sugar is dissolved.
- Once combined add heavy cream and extract. Stir gently until mixed. (If you whisk at this point your heavy cream could start becoming whipped cream so make sure you incorporate everything BEFORE you add the heavy cream).
- Cover and place in refrigerator for an hour or overnight. The longer it sits, the better the flavors will combine.
- Turn on ice cream maker and slowly pour mint mixture into frozen bowl and let it mix for about 15-20 or until thickened. (Everyone has their own preference for this, I like to keep mine on for 20 minutes.)
- At the last 5 minutes before its done, add in chocolate chips.
- Place in air-tight container and place in freezer overnight to harden, or serve immediately for soft serve consistency.
First off, I just want to thank everyone who has been supporting me through all of this hard work, it means a lot! I will continue to work hard on this website, my blog and my passion, baking. When you read this, it means Dana's Desserts is finally LIVE on the internet! How exciting!
Heres a rundown on what to expect!
- Dana's Desserts is a website full of homemade recipes I have created through the years of baking with friends and family. You can order anything you see in the "Menu" tab, or if you're interested in something you don't see, just let me know and I will do my best to make it!
- In the "Contact" section, you'll see pictures of cakes I've created, those are just some of the things I can create! Also, descriptions of each cake are below, but if you don't see a flavor you're interested in, mention it and I will make it.
- Also in the "Contact" section you can message me recipes you want reviewed, recipes you want created, recipe questions, or special orders!
- If you live in the area and order desserts you can pick them up or have them delivered (delivery fee TBD on delivery location), or have them shipped if you are not local (shipping fee TBD). Sorry, can't ship cakes!
- Lastly, here is my blog. This is where you will see requests from #3 posted, as well as my homemade recipes!
So take a look around and enjoy!
Follow me on Instagram, Twitter & Pinterest: @DanasDesserts
Thank you!
- Dana :)